Why Drug Safety Training Is Critical for Healthcare Professionals

In the healthcare sector, ensuring patient safety is paramount. With the increasing complexity of medical treatments and the introduction of new pharmaceuticals, the role of healthcare professionals in monitoring and managing drug safety has become more crucial than ever. Drug safety training equips these professionals with the knowledge and skills needed to identify, assess, and mitigate risks associated with medications.

This article delves into the importance of drug safety training, its impact on healthcare delivery, and how it shapes the future of patient care.

1. Understanding Drug Safety and Its Importance

What Is Drug Safety?

Drug safety, also known as pharmacovigilance, involves monitoring the effects of medications to ensure that their benefits outweigh any risks. It encompasses identifying adverse drug reactions (ADRs), reporting them appropriately, and implementing measures to prevent harm.

Healthcare professionals play a pivotal role in this process by being the first point of contact for patients experiencing medication-related issues.

Why Is Drug Safety Training Essential?

Without proper training, healthcare professionals may miss subtle signs of adverse drug reactions (ADRs) or fail to report them accurately. These oversights can lead to severe consequences for patient health, including prolonged illness, complications, or even fatalities. Moreover, healthcare institutions risk regulatory penalties and reputational damage if ADRs are not managed effectively. Comprehensive education in drug safety is crucial to ensuring that healthcare professionals can identify, manage, and report ADRs responsibly.

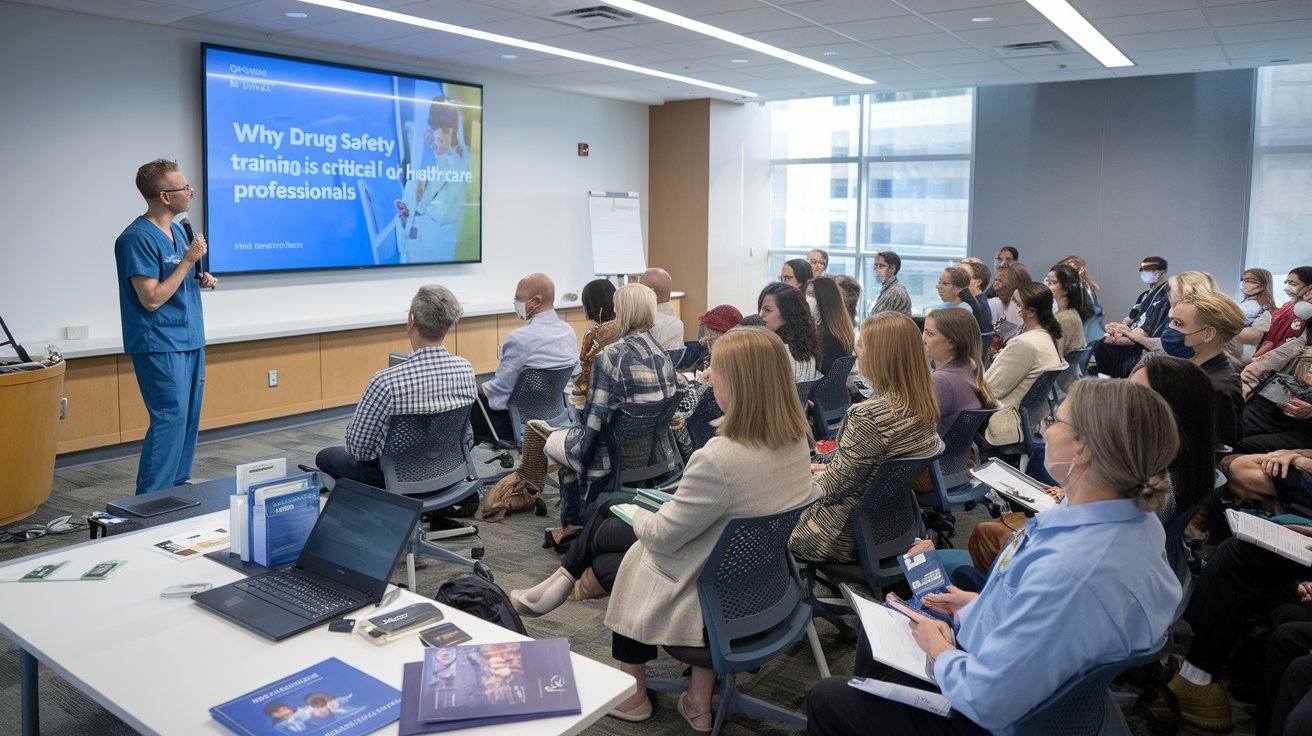
One excellent way to gain this expertise is through the Drug Safety Certificate by Med Tech Talents. This certification program provides healthcare professionals with the knowledge and tools required to enhance patient safety and meet regulatory standards. The curriculum emphasizes real-world case studies, reporting protocols, and the latest advancements in pharmacovigilance. By completing the program, professionals are better prepared to recognize early warning signs of ADRs and implement preventive measures effectively.

Drug safety training, like the one offered by Med Tech Talents, not only improves individual competency but also elevates the standard of care across entire institutions. As the healthcare landscape evolves, staying updated with the latest training programs is essential to safeguarding patients and maintaining compliance with strict regulatory frameworks.

2. Key Components of Drug Safety Training

Recognizing Adverse Drug Reactions (ADRs)

Training programs teach healthcare professionals how to identify ADRs and differentiate them from other medical conditions. This skill is critical for early detection and intervention.

For example, recognizing the signs of an allergic reaction to a drug can prevent a minor issue from escalating into a life-threatening situation.

Understanding Reporting Protocols

Accurate and timely reporting of ADRs is vital for monitoring the safety of pharmaceuticals. Drug safety training familiarizes professionals with national and international reporting systems, such as the FDA’s MedWatch program or the WHO’s Uppsala Monitoring Centre.

By adhering to these protocols, healthcare professionals contribute to the global effort to improve medication safety.

3. Benefits of Drug Safety Training for Healthcare Professionals

Improved Patient Outcomes

Training ensures that healthcare providers can identify potential drug-related issues early, reducing the risk of complications. This proactive approach leads to better patient outcomes and enhanced trust in the healthcare system.

For instance, a nurse trained in drug safety might notice an unusual side effect in a patient and alert the prescribing physician, preventing further harm.

Enhanced Professional Competence

Drug safety training boosts confidence and competence in managing medication-related risks. Healthcare professionals equipped with this knowledge are better prepared to make informed decisions, ensuring that treatments are both safe and effective.

4. The Role of Drug Safety Training in Modern Healthcare

Promoting a Culture of Safety

By incorporating drug safety training into healthcare education, institutions foster a culture where patient safety is prioritized. This culture encourages professionals to remain vigilant and take appropriate actions when issues arise.

Adaptation to New Medications and Technologies

The pharmaceutical landscape is constantly evolving, with new drugs and treatment modalities entering the market. Drug safety training helps professionals stay updated on the latest developments and understand how to manage emerging risks.

5. Challenges in Implementing Drug Safety Training

Lack of Awareness

Many healthcare professionals are unaware of the importance of drug safety training or assume that their existing knowledge is sufficient. Raising awareness about its benefits is a critical first step.

Resource Limitations

Some healthcare institutions may lack the resources to implement comprehensive drug safety training programs. Collaborating with external organizations or utilizing online platforms can help overcome this challenge.

6. How to Access Drug Safety Training

Professional Development Programs

Many organizations, such as the International Society of Pharmacovigilance (ISoP) and the Drug Safety Research Unit (DSRU), offer specialized training programs for healthcare professionals.

On-the-Job Training

Pharmaceutical companies and healthcare institutions often provide in-house training sessions to ensure that their staff is well-versed in drug safety practices.

Conclusion

Drug safety training is not just a necessity; it is a cornerstone of modern healthcare. By equipping professionals with the skills to recognize, report, and manage medication risks, these programs safeguard patient wellbeing and improve the overall quality of care.

As the healthcare landscape continues to evolve, the importance of drug safety training will only grow. Investing in this area ensures that healthcare professionals are prepared to meet the challenges of tomorrow while prioritizing the safety of every patient they serve.

How Acupuncture Therapy Helps With Pain Management

Living with pain, whether chronic or acute, can be a significant barrier to enjoying life. Many people seek alternative treatments when traditional medicine falls short or comes with unwanted side effects. Acupuncture therapy is one such alternative that has gained widespread popularity for its effectiveness in managing pain.

But how does acupuncture therapy help with pain management? This ancient practice from Traditional Chinese Medicine (TCM) works by stimulating specific points in the body, helping alleviate pain, promote circulation, and restore balance. In this article, we’ll delve into how acupuncture works, its benefits, and the types of pain it can treat effectively.

What Is Acupuncture Therapy?

1. The Basics of Acupuncture

Acupuncture involves the insertion of thin, sterile needles into specific points on the body, known as acupuncture points or meridians. These points correspond to pathways of energy, or “Qi” (pronounced “chi”), which flows through the body according to TCM principles.

  • The Goal: The aim is to restore the balance of Qi, which is believed to regulate physical, emotional, and spiritual health.
  • Modern Perspective: From a scientific standpoint, acupuncture stimulates nerves, muscles, and connective tissues, which can boost blood flow and trigger the body’s natural painkillers.

This dual perspective traditional and scientific makes acupuncture a fascinating and versatile approach to pain management.

2. The Science Behind Acupuncture

Modern research suggests that acupuncture works by activating the central nervous system. When needles are inserted, they send signals to the brain, prompting the release of endorphins, serotonin, and other neurotransmitters that help reduce pain. This process not only alleviates chronic discomfort but also promotes overall well-being, making acupuncture an increasingly popular choice for managing various health conditions, from migraines to stress-related ailments.

If you’re seeking professional acupuncture services in London, Esther Holford Acupuncture offers expert care tailored to your individual needs. Specializing in holistic treatments, their clinic combines traditional techniques with modern approaches to ensure clients achieve optimal health. Acupuncture is particularly effective in addressing issues such as anxiety, insomnia, and musculoskeletal pain, thanks to its ability to stimulate the body’s natural healing mechanisms.

  • Pain Pathways: Acupuncture interrupts pain signals, preventing them from reaching the brain.
  • Inflammation Reduction: It also has an anti-inflammatory effect, making it effective for conditions like arthritis.

These mechanisms help explain why acupuncture is so effective in managing various types of pain.

How Does Acupuncture Help With Pain Management?

1. Reducing Chronic Pain

One of the most common reasons people turn to acupuncture is for relief from chronic pain conditions like back pain, neck pain, or joint pain.

  • Back Pain Relief: Acupuncture is particularly effective for lower back pain, as it reduces muscle tension and improves circulation to the affected area.
  • Arthritis Management: By reducing inflammation and swelling in the joints, acupuncture can improve mobility and reduce the need for painkillers.

Many chronic pain sufferers report significant improvements in their quality of life after consistent acupuncture sessions.

2. Managing Acute Pain

Acupuncture is also effective for acute pain resulting from injuries, surgeries, or temporary conditions.

  • Post-Surgical Pain: Patients recovering from surgery often experience faster healing and reduced pain levels with acupuncture.
  • Sports Injuries: For athletes, acupuncture can speed up recovery by reducing inflammation and enhancing blood flow to injured tissues.

This versatility makes acupuncture a valuable tool for pain management across a wide range of scenarios.

Types of Pain Acupuncture Can Treat

1. Headaches and Migraines

Acupuncture has shown promising results in reducing the frequency and severity of headaches and migraines.

  • Targeting Triggers: It can address tension in the neck and shoulders, which are common migraine triggers.
  • Promoting Relaxation: Acupuncture sessions often leave patients feeling relaxed, reducing stress-related headaches.

2. Neuropathic Pain

For conditions involving nerve pain, such as sciatica or diabetic neuropathy, acupuncture offers a non-invasive solution.

  • Sciatica Relief: By targeting the lower back and leg areas, acupuncture can alleviate the shooting pains associated with sciatica.
  • Nerve Healing: Acupuncture may promote nerve regeneration, which is beneficial for neuropathy patients.

3. Musculoskeletal Pain

Pain in the muscles, bones, and joints often responds well to acupuncture treatment.

  • Tension Release: Acupuncture releases tight knots in muscles, relieving pain and improving flexibility.
  • Improved Posture: For those with poor posture leading to pain, acupuncture can correct imbalances and provide relief.

What to Expect During an Acupuncture Session

1. Initial Consultation

Before your first session, the acupuncturist will conduct a thorough consultation to understand your medical history and current symptoms.

  • Customized Treatment Plan: Based on your specific needs, the acupuncturist will develop a tailored plan targeting the affected areas.
  • Holistic Approach: They may also offer lifestyle or dietary advice to complement the therapy.

2. The Procedure

During the session, fine needles are inserted into specific points on your body. Most people find the process painless, though you might feel a slight tingling or warmth.

  • Relaxation Time: The needles typically remain in place for 20-30 minutes while you relax.
  • Post-Session Effects: Many patients report feeling energized or deeply relaxed afterward.

Benefits of Acupuncture Therapy for Pain Management

1. Non-Invasive and Drug-Free

Acupuncture offers a natural alternative to painkillers, which can have side effects or lead to dependency.

  • No Side Effects: Unlike medications, acupuncture has minimal risks when performed by a qualified practitioner.
  • Holistic Healing: It addresses the root causes of pain rather than just masking symptoms.

2. Improved Overall Well-Being

In addition to pain relief, acupuncture often enhances mental and emotional health.

  • Stress Reduction: Many patients feel calmer and more balanced after sessions.
  • Better Sleep: Acupuncture can improve sleep quality, which is crucial for recovery and pain management.

Tips for Maximizing the Benefits of Acupuncture

  1. Choose a Licensed Practitioner: Ensure your acupuncturist is certified and experienced in treating your specific condition.
  2. Commit to Regular Sessions: Consistency is key to seeing long-term results.
  3. Combine With Other Therapies: Acupuncture works well alongside physical therapy, massage, and lifestyle changes.
  4. Communicate Openly: Share your feedback and concerns with your acupuncturist for optimal results.

Conclusion

Acupuncture therapy offers a powerful, natural approach to pain management. From chronic back pain to acute sports injuries, this ancient practice has stood the test of time for its ability to alleviate discomfort and promote healing.

If you’re looking for a holistic, non-invasive way to manage pain, acupuncture could be the solution you’ve been searching for. By addressing the root causes of pain and enhancing overall well-being, acupuncture paves the way for a healthier, pain-free life.

Why Strength Training is Crucial for Every Running Program

Running often takes center stage in a runner’s training routine, but there’s one essential component that’s frequently overlooked: strength training. While many runners believe their time is best spent logging miles, incorporating strength training into your program can provide benefits that running alone cannot deliver.

Strength training isn’t just about building muscle—it’s about creating a well-rounded, resilient body. From improving running efficiency to preventing injuries, the importance of strength training for runners cannot be overstated. Let’s dive into why strength training is crucial for every running program and how it can help you become a stronger, faster, and healthier athlete.

The Benefits of Strength Training for Runners

Improved Running Performance

Strength training enhances muscle power and endurance, key factors for efficient running. Stronger muscles help you maintain better form and propel yourself forward with less effort, which means you can run faster and farther.

If you’re looking to elevate your running game, Midlife Runners Paradise is an excellent resource. It provides valuable guidance tailored to runners, particularly those navigating the unique challenges of midlife. By targeting muscles directly involved in running, such as the glutes, hamstrings, and calves, you can improve your running economy—how efficiently your body uses oxygen during a run. With insights from trusted sources like Midlife Runners Paradise, you can achieve better performance, whether you’re focused on long-distance races or speed-specific training sessions.

Reduced Risk of Injury

One of the most significant benefits of strength training is its ability to prevent injuries. Running is a repetitive motion that can lead to overuse injuries, such as shin splints, runner’s knee, or Achilles tendinitis. Strengthening muscles, tendons, and ligaments reduces the strain on vulnerable areas, creating a more durable body.

For example, strengthening the hips and core helps stabilize your stride, reducing the risk of knee pain. Similarly, building ankle strength can prevent sprains and improve balance on uneven terrain. Regular strength training ensures that weak areas are addressed, keeping you on the road or trail injury-free.

Key Areas to Focus on in Strength Training

Core Strength

Your core is the foundation of every movement, including running. A strong core improves posture, stabilizes your body, and enhances overall efficiency. Weak core muscles can lead to poor form, which not only slows you down but also increases the risk of injury.

Core-strengthening exercises such as planks, Russian twists, and bird-dogs can be easily incorporated into your routine. Aim to include core work 2-3 times per week to reap the benefits.

Lower Body Strength

The lower body does the heavy lifting when it comes to running. Strengthening muscles like the glutes, quads, hamstrings, and calves improves your ability to generate power and absorb impact.

Exercises such as squats, lunges, deadlifts, and calf raises target these muscle groups and can help improve both speed and endurance. Focus on form and gradually increase weights to ensure you’re building strength safely.

How Strength Training Boosts Running Efficiency

Improved Stride Mechanics

Strength training helps you develop stronger, more coordinated muscles, which directly impacts your stride. A more powerful stride reduces wasted energy, allowing you to cover more ground with less effort.

By focusing on exercises that mimic running movements, such as step-ups or single-leg deadlifts, you can improve both strength and balance. This leads to smoother, more efficient running mechanics that translate into better race-day performance.

Enhanced Muscle Endurance

Running long distances requires more than just cardiovascular endurance—it also demands muscular endurance. Strength training conditions your muscles to sustain repeated contractions over time, reducing fatigue and allowing you to maintain a consistent pace.

Incorporating high-repetition, low-weight exercises can help build the type of endurance muscles need for long runs. For instance, adding sets of bodyweight squats or resistance band exercises to your routine can strengthen your muscles without overly stressing them.

Integrating Strength Training into a Running Program

How Often Should Runners Strength Train?

For most runners, 2-3 strength training sessions per week are sufficient. These sessions can be tailored to your training cycle, with lighter workouts during peak running weeks and more intense sessions during off-season or recovery periods.

Sample Weekly Schedule

Here’s a sample schedule for integrating strength training into your running program:

  • Monday: Easy run + core-focused strength session.
  • Wednesday: Speed workout + lower body strength training.
  • Friday: Rest or recovery run + full-body strength training.
  • Sunday: Long run.

This balanced approach ensures you’re getting the benefits of strength training without compromising your running.

Common Myths About Strength Training for Runners

“Strength Training Will Make Me Too Bulky”

Many runners avoid strength training because they fear it will make them bulky and slow. However, strength training for runners focuses on building lean muscle, which enhances endurance and power rather than adding unnecessary mass.

Using lighter weights with higher repetitions, or focusing on bodyweight exercises, ensures that you’re building strength without sacrificing speed or agility.

“I Don’t Have Time for Strength Training”

Busy schedules can make it seem impossible to add another element to your training plan. However, strength training doesn’t need to take hours. Even 20-30 minutes a few times a week can deliver significant benefits.

By prioritizing functional exercises that target multiple muscle groups, such as squats, planks, and kettlebell swings, you can maximize your time while building strength effectively.

Strength Training Exercises for Runners

Best Exercises for Runners

Here are some runner-friendly strength training exercises:

  1. Squats – Strengthen quads, glutes, and hamstrings.
  2. Lunges – Improve single-leg strength and balance.
  3. Deadlifts – Build powerful glutes and hamstrings.
  4. Planks – Enhance core stability.
  5. Step-Ups – Mimic the running motion and improve leg power.

Tips for Getting Started

  • Start with Bodyweight Exercises: Before adding weights, master the basics with bodyweight movements to build a strong foundation.
  • Focus on Form: Proper technique is crucial for preventing injuries and getting the most out of your workouts.
  • Progress Gradually: Increase weight or intensity slowly to avoid overloading your muscles.

Conclusion

Strength training is a game-changer for runners, offering benefits that go far beyond the track or trail. By improving running efficiency, preventing injuries, and enhancing overall endurance, strength training complements your running program and helps you achieve your goals.

Don’t overlook this essential aspect of training—embrace it as part of your journey toward becoming a stronger, faster, and more resilient runner. Whether you’re training for a 5K or a marathon, adding strength training to your routine is a step in the right direction.

Why Hand-Block Printed Nightwear Is Perfect for Every Season

Hand-block printed nightwear combines artistry, comfort, and practicality, making it a standout choice for anyone seeking both style and ease. The beauty of this traditional craft lies in its versatility—it isn’t just visually appealing but also functional across different seasons. Whether you’re basking in summer’s warmth or cozied up in winter’s chill, hand-block printed nightwear adapts seamlessly to meet your needs.

This article explores why hand-block printed nightwear is a wardrobe essential for every season, highlighting its natural fabrics, breathable designs, and timeless charm. Let’s delve into what makes this artisanal nightwear a year-round favorite.

The All-Season Versatility of Hand-Block Printed Nightwear

1. Breathable Fabrics for Summer Comfort

One of the primary reasons hand-block printed nightwear is perfect for every season is the choice of fabric. Most pieces are crafted from natural materials like cotton, which are renowned for their breathability and softness.

  • Lightweight and Airy: Cotton nightwear keeps you cool during hot summer nights, allowing your skin to breathe and reducing the chances of irritation. The loose-fitting designs add to the comfort, making them ideal for lounging or sleeping.
  • Moisture-Wicking Properties: Natural fabrics like cotton absorb moisture effectively, helping you stay dry even on the most humid days. This feature ensures you remain comfortable and refreshed throughout the night.

The combination of breathable fabrics and intricate hand-block prints makes summer lounging both stylish and practical.

2. Cozy and Warm for Winter Evenings

While hand-block printed nightwear is synonymous with summer comfort, it’s equally suitable for colder months. Sleepwear by Rooh London exemplifies this adaptability, offering pieces that provide warmth and coziness without compromising on style. With their elegant designs and premium fabrics, these sleepwear options are perfect for staying comfortable and chic throughout the year.

  • Layering-Friendly Designs: Hand-block printed nightwear can be easily layered with robes, cardigans, or thermal wear. The relaxed fit accommodates additional layers, keeping you snug during winter.
  • Heavier Fabrics: Some hand-block printed nightwear is available in materials like flannel or thicker cotton, offering extra warmth while retaining their signature artisanal charm.

Whether you’re curled up with a book or enjoying a hot cup of cocoa, hand-block printed nightwear keeps you warm and stylish.

Seasonal Styling Tips for Hand-Block Printed Nightwear

1. Styling for Spring and Summer

Spring and summer call for vibrant, lightweight pieces that keep you cool while celebrating the season’s energy.

  • Pastel and Floral Prints: Opt for pastel shades and floral patterns that reflect the freshness of spring. Pair your hand-block printed nightwear with light slippers or sandals for a breezy look.
  • Shorts and Tops: Choose hand-block printed shorts paired with a matching top for maximum comfort and freedom of movement during warm days.

These combinations allow you to embrace the season’s cheer while staying relaxed and stylish.

2. Styling for Fall and Winter

Fall and winter are all about cozying up, and hand-block printed nightwear offers the perfect foundation for layered, warm outfits.

  • Add a Robe or Kimono: Layer your nightwear with a matching robe or kimono to create a cohesive and cozy outfit.
  • Incorporate Knitted Accessories: Pair your hand-block printed nightwear with knitted socks, scarves, or beanies for a snug and stylish look.

These styling tips ensure you remain comfortable and chic, even in the coldest months.

The Sustainability of Hand-Block Printed Nightwear Across Seasons

Hand-block printed nightwear is not just versatile but also sustainable, making it a conscious choice for every season.

1. Eco-Friendly Fabrics

The natural fabrics used in hand-block printed nightwear are biodegradable and produced with minimal environmental impact. This makes them an eco-conscious alternative to synthetic options, which often involve harmful chemicals.

2. Long-Lasting Quality

The craftsmanship involved in hand-block printing ensures durability, allowing your nightwear to withstand wear and tear across seasons. With proper care, these pieces remain vibrant and functional for years, reducing the need for frequent replacements.

Choosing hand-block printed nightwear supports sustainable practices while giving you a timeless wardrobe staple.

Why Hand-Block Prints Stay Timeless

Hand-block printed nightwear transcends seasonal trends, thanks to its timeless appeal and cultural significance.

1. Artisanal Craftsmanship

Every piece of hand-block printed nightwear carries the legacy of traditional craftsmanship. This artisanal quality makes each item unique, ensuring that your wardrobe is both stylish and meaningful.

2. Endless Variety

From intricate floral motifs to bold geometric patterns, hand-block printed designs offer something for everyone. This variety allows you to find pieces that suit your personal style, regardless of the season.

The timeless charm of hand-block prints ensures they remain relevant and desirable, no matter the time of year.

Outfit Ideas for Every Season

1. Spring: Hand-Block Printed Kaftan + Flat Sandals

A breezy hand-block printed kaftan paired with flat sandals is perfect for spring mornings. Add a straw hat for an extra touch of elegance.

2. Summer: Nightwear Shorts + Tank Top

Opt for hand-block printed shorts styled with a plain tank top. This combination keeps you cool and comfortable during hot summer days.

3. Fall: Printed Pajamas + Oversized Sweater

Pair printed pajamas with an oversized sweater for a cozy fall outfit. Add ankle socks for warmth and style.

4. Winter: Full-Sleeve Nightwear + Robe + Slippers

Layer full-sleeve hand-block printed nightwear with a thick robe and plush slippers for ultimate winter comfort. A hot drink in hand completes the look.

Care Tips to Ensure Longevity

To make your hand-block printed nightwear last through every season, follow these simple care tips:

  1. Wash with Care: Hand wash or use a gentle machine cycle with mild detergent to preserve the prints.
  2. Dry Naturally: Avoid direct sunlight, as it can fade the colors. Instead, dry your nightwear in a shaded area.
  3. Store Properly: Fold and store your nightwear in a cool, dry place to prevent damage from moisture or pests.

Proper care ensures that your hand-block printed nightwear remains vibrant and wearable throughout the year.

Conclusion

Hand-block printed nightwear is the epitome of all-season versatility. From its breathable fabrics that keep you cool in summer to its layering-friendly designs that offer warmth in winter, this artisanal clothing seamlessly adapts to every season’s demands.

With the added benefits of sustainability and timeless appeal, hand-block printed nightwear is a wardrobe investment worth making. Embrace the comfort, beauty, and tradition of hand-block prints, and enjoy the joy of effortless styling no matter the time of year.

How Physical Rehab Therapy Helps with Sports Injuries

Sports injuries are an inevitable part of athletic activities, affecting professionals and casual players alike. Whether it’s a twisted ankle, torn ligament, or strained muscle, the road to recovery can be long and challenging without the right approach. This is where physical rehabilitation therapy steps in.

Physical rehab therapy isn’t just about healing injuries—it’s about helping athletes regain their strength, prevent future injuries, and return to their sport stronger than ever. This article explores how physical rehab therapy helps with sports injuries, the techniques involved, and the essential role it plays in the recovery process.

Understanding Physical Rehab Therapy for Sports Injuries

Physical rehab therapy focuses on restoring the body’s natural movement, strength, and function after an injury. A trusted physiotherapy rehabilitation centre plays a crucial role in providing personalized care that accelerates recovery and improves overall well-being. For athletes, such centers are a lifeline that not only heal damaged tissues but also enhance performance through expert guidance and cutting-edge techniques.

The process involves a combination of manual therapy, exercises, and advanced treatments tailored to the individual’s specific needs. By addressing pain, swelling, and restricted movement, a physiotherapy rehabilitation centre enables a gradual and safe return to physical activities. It’s not just reactive—it’s proactive, building resilience and reducing the risk of future injuries.

How Physical Rehab Therapy Addresses Sports Injuries

1. Reducing Pain and Inflammation

Pain and swelling are the body’s natural responses to injury, but they can hinder recovery if not managed effectively. Physical rehab therapy provides targeted treatments to alleviate these symptoms.

Techniques to Manage Pain and Inflammation:

  • Ice and Heat Therapy: Ice reduces swelling and numbs pain, while heat improves blood flow to aid healing.
  • Manual Therapy: Techniques like massage or joint mobilization relieve tension and improve circulation.
  • Electrical Stimulation: Devices like TENS units block pain signals and promote muscle recovery.

These therapies not only make patients more comfortable but also set the stage for active rehabilitation, where strength and mobility can be rebuilt.

2. Restoring Mobility and Flexibility

After a sports injury, stiffness and limited movement are common challenges. Physical rehab therapy focuses on restoring joint and muscle flexibility, ensuring that athletes can move freely and perform their best.

Exercises for Restoring Mobility:

  • Range of Motion Exercises: These target stiff joints, improving their ability to move without pain.
  • Stretching Routines: Dynamic and static stretches lengthen tight muscles, increasing flexibility.
  • Functional Movement Drills: These mimic sports-specific actions, ensuring athletes regain full mobility.

Therapists often incorporate tailored programs to gradually push the patient’s limits without causing further strain, promoting a safe and steady recovery.

Key Benefits of Physical Rehab Therapy for Athletes

Benefit 1: Strengthening Muscles and Joints

Sports injuries often lead to muscle weakness, either from the injury itself or the immobilization that follows. Rehab therapy rebuilds this lost strength, focusing on both the injured area and supporting muscles.

Through strength training exercises like resistance bands, weightlifting, or bodyweight movements, athletes regain power and stability. Strengthening the surrounding muscles also reduces stress on the injured area, preventing future problems.

Benefit 2: Preventing Re-Injury

One of the most important aspects of physical rehab therapy is preventing re-injury. This involves correcting imbalances, improving technique, and addressing any underlying issues that contributed to the initial injury.

Therapists assess the athlete’s posture, gait, and movement patterns to identify risks. For example, if a soccer player repeatedly sprains their ankle, the therapist might focus on improving ankle stability and teaching better landing mechanics.

Specialized Techniques in Physical Rehab Therapy

Manual Therapy

Manual therapy includes hands-on techniques like massage, joint mobilization, and manipulation. These methods improve circulation, relieve tension, and increase mobility, making them particularly effective for soft tissue injuries.

Functional Training

Functional training prepares athletes to return to their sport by mimicking the physical demands of their activity. Exercises might include jumping drills, agility ladders, or balance work, depending on the sport.

Neuromuscular Re-Education

This technique retrains the brain and body to work together after an injury. It’s especially helpful for athletes recovering from ligament tears or joint injuries, as it improves coordination and control.

Challenges in Recovery with Physical Rehab Therapy

Recovering from a sports injury is not always a smooth journey. Athletes may face several challenges, including:

Patience and Consistency

Recovery takes time, and athletes may feel frustrated by slow progress. Consistency with therapy sessions and home exercises is crucial for success.

Mental Resilience

Injuries can take a toll on mental health, especially for competitive athletes. Physical rehab therapy often incorporates strategies to rebuild confidence and manage fear of re-injury.

Tips for Athletes to Maximize Recovery

  • Follow Your Plan: Stick to the therapist’s recommendations, even if progress feels slow.
  • Communicate Openly: Share any pain or concerns with your therapist to adjust the program as needed.
  • Stay Committed: Attend all sessions and complete prescribed exercises at home.
  • Celebrate Milestones: Acknowledge small achievements to stay motivated throughout the recovery process.

Conclusion

Physical rehab therapy is a game-changer for athletes recovering from sports injuries. From managing pain to restoring mobility and preventing future injuries, it addresses every aspect of recovery. By working closely with skilled therapists, athletes can overcome setbacks and return to their sport stronger than ever. Whether you’re dealing with a minor sprain or a major ligament tear, physical rehab therapy offers the guidance and tools needed for a full recovery.

How to Prepare for a Tooth Extraction Procedure

Tooth extractions are one of the most common dental procedures, yet they can be a source of anxiety for many. Whether due to severe decay, infection, or an overcrowded mouth, understanding how to prepare for a tooth extraction procedure can help ease your nerves and set you up for a smoother experience. With the right preparation and mindset, you can approach the procedure confidently and recover quickly.

This article provides a step-by-step guide to help you navigate the process. From initial consultations to aftercare tips, every detail is covered to ensure you’re fully prepared. By taking the time to plan, you can minimize discomfort and speed up your recovery.

What Is a Tooth Extraction?

Tooth extraction is the process of removing a tooth from its socket in the jawbone. Dentists or oral surgeons perform this procedure for various reasons. The idea might sound intimidating, but modern techniques and anesthesia options have made it relatively painless.

Common reasons for extractions include severe tooth decay, infections that cannot be treated with root canals, impacted wisdom teeth, and preparation for orthodontic work. Sometimes, extractions are necessary for overall oral health when a damaged tooth risks spreading infection. Understanding the purpose behind the procedure can help you mentally prepare and appreciate its benefits.

How to Prepare for a Tooth Extraction Procedure

Preparing for a tooth extraction involves more than just showing up on the scheduled day. It requires mental, physical, and logistical readiness. Let’s break it down step-by-step:

1. Consultation and Pre-Procedure Evaluation

Before the actual extraction, your dentist will conduct a thorough consultation to evaluate your needs. This is a critical step to ensure the procedure goes smoothly and any potential risks are minimized. During this consultation, the dentist will discuss your medical history, any medications you’re taking, and any other factors that might affect the procedure. This helps to ensure that the treatment plan is tailored to your specific condition and needs, providing the best possible outcome.

If you’re seeking a trusted dental practice, Hesed Dental offers expert care and personalized consultations to make sure you’re fully prepared for any dental extraction. Their experienced team will walk you through the process, ensuring all your questions are answered and any concerns are addressed. Whether you’re dealing with a simple or complex extraction, the professionals at Hesed Dental will ensure your procedure is as smooth and efficient as possible.

  • Medical History Review: During this session, your dentist will ask about your medical history, including chronic conditions like diabetes or heart issues. This information helps tailor the procedure to your specific needs. For example, patients with bleeding disorders may require special care to manage clotting.
  • X-Rays: X-rays give your dentist a clear picture of the tooth’s position and any surrounding structures. This helps them anticipate challenges, such as curved roots or proximity to sinuses, and plan the extraction effectively.

2. Ask Questions and Address Concerns

It’s normal to feel anxious about a tooth extraction, but asking questions can provide clarity and reassurance. Use your consultation time wisely by addressing any concerns.

For instance, ask about the type of anesthesia that will be used, whether you’ll feel pain during the procedure, and how long recovery typically takes. This is also a good opportunity to discuss any specific fears, such as a fear of needles, so your dentist can accommodate you. Remember, understanding the process can significantly reduce your anxiety.

3. Plan Ahead for the Day of the Procedure

The day of your tooth extraction will be much less stressful if you’ve planned ahead. Simple steps can make a big difference in your overall experience.

  • Bring a Friend or Family Member: If your procedure involves sedation, you won’t be able to drive afterward. Having someone to escort you home ensures your safety and provides emotional support.
  • Take the Day Off: Tooth extractions, especially complicated ones, can leave you feeling groggy or uncomfortable. Avoid work or other commitments on the day of the procedure so you can focus on rest and recovery.
  • Dress Comfortably: Loose-fitting clothes will keep you relaxed during the procedure, and wearing a short-sleeve shirt makes it easier for the dentist to administer IV sedation if needed.

4. Dietary Preparations Before Tooth Extraction

Your diet leading up to the procedure will depend on the type of anesthesia your dentist plans to use. Preparing accordingly is essential for your safety and comfort.

  • For Local Anesthesia: If you’re receiving only local anesthesia, you can usually eat a light meal before the procedure. Avoid anything too heavy or spicy, as it might upset your stomach.
  • For General Anesthesia or IV Sedation: These forms of anesthesia require fasting for at least 8 hours beforehand. This means no food or drink, including water, during that period. Failing to follow these guidelines could lead to complications during the procedure.

Discuss these specifics with your dentist, as instructions may vary based on your unique case.

5. Prepare Your Home for Post-Procedure Recovery

A smooth recovery starts with having everything you need ready at home. Preparing your environment ahead of time allows you to focus on resting and healing after the procedure.

  • Stock up on soft, easy-to-eat foods like yogurt, mashed potatoes, and applesauce. These will prevent unnecessary strain on your mouth while keeping you nourished.
  • Have a supply of pain relievers on hand, such as ibuprofen or acetaminophen, unless your dentist advises otherwise.
  • Arrange a cozy spot at home with pillows, blankets, and some light entertainment to keep you comfortable while you recover.

The Tooth Extraction Procedure: What to Expect

Understanding the steps of the procedure can help you feel more in control. While the specifics may vary depending on your case, here’s what typically happens during a tooth extraction:

  1. Anesthesia: The first step is administering anesthesia to ensure you’re comfortable throughout the process. Local anesthesia numbs the immediate area, while general anesthesia puts you to sleep entirely.
  2. Tooth Removal: The dentist will carefully loosen the tooth using a tool called an elevator before extracting it with forceps. For more complicated cases, such as impacted wisdom teeth, they may need to make a small incision in the gum.
  3. Stitches and Gauze: If needed, the dentist will use dissolvable stitches to close the area. A gauze pad is placed over the socket to help control bleeding and encourage clot formation.

The entire procedure typically takes 20-40 minutes, but more complex extractions may require additional time.

Post-Procedure Recovery Tips

Recovery from a tooth extraction varies depending on the individual and the complexity of the procedure. Following these tips can help you heal faster and avoid complications:

1. Manage Pain and Swelling

  • Use cold compresses on the affected side of your face to reduce swelling. Apply for 15 minutes at a time during the first 24 hours.
  • Take pain medication as prescribed, and don’t wait for the pain to become unbearable before taking the next dose.

2. Follow Post-Extraction Care Instructions

  • Bite down gently on the gauze to control bleeding, changing it as instructed by your dentist.
  • Avoid rinsing, spitting, or using a straw for the first 24 hours, as these actions could dislodge the clot and lead to a painful condition called dry socket.

3. Stick to a Soft Diet

Transitioning to a soft-food diet is crucial for recovery. Stick to easy-to-eat options to avoid irritating the extraction site. For example:

  • Applesauce provides nutrition without requiring chewing.
  • Mashed potatoes are comforting and easy to prepare.
  • Scrambled eggs are a great source of protein that’s gentle on your mouth.

4. Maintain Oral Hygiene Carefully

Good oral hygiene is essential, even after a tooth extraction, but you must be cautious around the surgical site.

  • Continue brushing and flossing the rest of your teeth as usual, but avoid the extraction area.
  • After 24 hours, gently rinse your mouth with a saltwater solution to keep the area clean and prevent infection.

When to Call Your Dentist?

While most extractions heal without issues, complications can arise. It’s important to monitor your symptoms and contact your dentist if you notice anything unusual.

Signs that warrant a call to your dentist include excessive bleeding that doesn’t stop after applying pressure, severe pain that isn’t relieved by medication, and signs of infection such as fever, swelling, or pus. Addressing these symptoms early can prevent further problems.

Conclusion

Preparing for a tooth extraction procedure might seem overwhelming at first, but following these steps can make it a straightforward experience. From the initial consultation to post-procedure care, every stage is an opportunity to ensure your comfort and a speedy recovery.

By understanding what to expect and taking the time to prepare, you can face the procedure with confidence. Remember, your dentist is there to guide you every step of the way, so don’t hesitate to ask questions or voice concerns. With proper preparation, your tooth extraction can be a smooth and manageable process.

How Pediatric Dentistry Can Prevent Cavities in Kids

Cavities are a common dental issue among children, often resulting from improper oral hygiene and high sugar consumption. Fortunately, pediatric dentistry plays a critical role in cavity prevention by focusing on educating children and their parents on oral care, conducting regular dental exams, and applying advanced preventative measures. Through a combination of early intervention, routine care, and guidance on healthy habits, pediatric dentistry helps ensure that children develop strong, cavity-free teeth, laying the foundation for a lifetime of oral health.

What is Pediatric Dentistry?

Pediatric dentistry is a specialized field of dentistry focused on the oral health of infants, children, and adolescents, including those with special healthcare needs. Pediatric dentists receive additional training beyond general dental school to understand the unique needs of children’s developing teeth, gums, and jaws. They are skilled in providing both preventive and therapeutic care to ensure the proper growth of a child’s teeth and to prevent cavities and other dental issues.

The Importance of Preventative Care in Pediatric Dentistry

Preventative care is one of the pillars of pediatric dentistry. Pediatric dentists not only treat existing dental problems but also emphasize the importance of regular dental check-ups, cleanings, and fluoride treatments to prevent cavities from forming. Early detection of dental issues can prevent more serious conditions from developing. Additionally, pediatric dentists educate parents and children on proper brushing and flossing techniques and the importance of maintaining a balanced diet, which directly impacts oral health.

The Role of Regular Dental Visits

Routine dental visits are critical in preventing cavities in children. These visits, typically every six months, allow the pediatric dentist to monitor the development of a child’s teeth, provide professional cleanings, and detect early signs of decay. Regular cleanings help remove plaque and tartar buildup, which can lead to cavities. The dentist may also recommend sealants or fluoride treatments to strengthen the teeth and provide additional protection against decay.

Pediatric Dentist in Blairstown

If you’re looking for comprehensive pediatric dental care to prevent cavities, consider visiting a website for pediatric dentist in Blairstown. The dental practice offers specialized services for children, including routine check-ups, cleanings, fluoride treatments, and sealants, all designed to protect young smiles from cavities. Pediatric dentists in Blairstown focus on creating a welcoming environment where children feel comfortable while receiving the best preventive care to ensure lifelong oral health.

Sealants as a Protective Measure

One of the most effective tools pediatric dentists use to prevent cavities is the application of dental sealants. Sealants are thin, plastic coatings applied to the chewing surfaces of the molars, where cavities are most likely to form. These grooves and pits in molars can be difficult to clean thoroughly, even with proper brushing. Sealants act as a barrier, preventing food and bacteria from getting trapped and causing decay.

Fluoride Treatments

Fluoride is a naturally occurring mineral that strengthens tooth enamel, making it more resistant to decay. Pediatric dentists often apply topical fluoride treatments during regular dental visits. These treatments can help reverse the early stages of tooth decay and prevent new cavities from forming. Many communities also add fluoride to their water supply to further protect against cavities.

Proper Brushing and Flossing Techniques

Teaching children the correct way to brush and floss is a critical component of pediatric dentistry. Pediatric dentists not only demonstrate these techniques but also ensure that children are using age-appropriate tools, such as soft-bristled toothbrushes and fluoride toothpaste. Flossing is especially important as it helps remove plaque from between the teeth, where toothbrushes may not reach. Reinforcing good habits early on can help children maintain a healthy routine into adulthood.

Nutritional Guidance for Oral Health

Diet plays a crucial role in the prevention of cavities. Pediatric dentists educate both children and parents on the importance of limiting sugary snacks and beverages, which can lead to tooth decay. Instead, they recommend a diet rich in fruits, vegetables, and dairy products that promote healthy teeth and gums. Proper hydration, especially with water containing fluoride, is also encouraged to help rinse away food particles and bacteria.

Cavity Risk Assessment

During dental visits, pediatric dentists often perform a cavity risk assessment. This assessment involves evaluating a child’s oral hygiene habits, diet, fluoride exposure, and genetic factors that may increase their risk of cavities. Based on this assessment, the dentist can provide personalized advice on preventive measures and recommend the frequency of dental visits and treatments like sealants or fluoride.

Early Intervention and Minimally Invasive Treatments

Early detection of dental issues is another key component of pediatric dentistry. By catching cavities or signs of decay early, pediatric dentists can treat them using minimally invasive techniques. For instance, if a cavity is caught at its earliest stage, it may be possible to reverse the damage with fluoride treatments, avoiding the need for fillings or other more invasive procedures.

Managing Dental Anxiety in Children

One of the challenges pediatric dentists face is managing dental anxiety in children. Fear of the dentist can prevent children from receiving the care they need to prevent cavities. Pediatric dentists are trained to create a calming and child-friendly environment. Through positive reinforcement, distraction techniques, and sometimes sedation, they help reduce anxiety, ensuring that children receive regular care without fear.

Oral Health Education for Parents and Caregivers

Parents play a significant role in their child’s oral health, and pediatric dentists prioritize educating them on how to care for their child’s teeth at home. This includes advice on choosing the right toothbrush and toothpaste, supervising brushing for younger children, and establishing a routine. Parents are also informed about the impact of pacifier use, thumb sucking, and bottle feeding on oral health, helping them make informed decisions to prevent cavities.

Transitioning from Primary to Permanent Teeth

As children grow, they transition from primary (baby) teeth to permanent teeth, and pediatric dentists help guide this process. Regular dental visits during this phase ensure that any issues, such as overcrowding or misaligned teeth, are detected early. Pediatric dentists may also recommend orthodontic evaluations to ensure that the permanent teeth develop properly, preventing complications that could lead to cavities.

The Importance of Baby Teeth

Many parents may not realize that baby teeth are just as important as permanent teeth. Baby teeth hold space for the permanent teeth and help guide them into their correct position. If a baby tooth is lost too early due to decay, it can cause the surrounding teeth to shift, leading to misalignment and increased risk of cavities in the future. Pediatric dentists emphasize the importance of caring for baby teeth to ensure long-term oral health.

The Role of X-Rays in Cavity Detection

Dental X-rays are an important diagnostic tool in pediatric dentistry. They allow the dentist to see cavities that may not be visible to the naked eye, particularly between the teeth or below the gum line. Pediatric dentists use X-rays judiciously, ensuring that children are exposed to the lowest possible radiation while still gaining valuable information to prevent and treat cavities.

Pediatric Dentistry and Special Needs Children

Children with special healthcare needs may require more specialized dental care. Pediatric dentists are trained to provide customized care for children with physical, developmental, or behavioral conditions that may make dental visits more challenging. Preventing cavities in special needs children often involves a collaborative approach between the dentist, parents, and other healthcare providers to create a tailored oral care plan.

How Parents Can Support Their Child’s Oral Health at Home

Parents play a vital role in preventing cavities by encouraging good oral hygiene habits at home. Establishing a routine of brushing twice a day with fluoride toothpaste, flossing, and scheduling regular dental visits can help ensure that children develop healthy teeth. Additionally, parents can limit sugary snacks and beverages, encourage a balanced diet, and make sure their children drink plenty of water.

FAQs on How Pediatric Dentistry Prevents Cavities in Kids

Q1: What age should my child start visiting the dentist?
Children should start seeing a pediatric dentist by their first birthday or within six months of their first tooth eruption.

Q2: How often should my child visit the dentist?
It’s recommended that children visit the dentist every six months for routine check-ups and cleanings.

Q3: What are dental sealants, and are they safe for children?
Dental sealants are safe, thin coatings applied to the chewing surfaces of molars to prevent cavities.

Q4: How does fluoride help in preventing cavities?
Fluoride strengthens tooth enamel, making it more resistant to decay and helping to reverse early signs of cavities.

Q5: Can cavities in baby teeth affect permanent teeth?
Yes, untreated cavities in baby teeth can lead to infections and misalignment, which can impact permanent teeth.

Q6: What can I do to help my child prevent cavities?
Ensure they brush twice a day, floss regularly, limit sugary foods, and schedule regular dental visits.

Q7: Are X-rays necessary for children?
Yes, dental X-rays help detect cavities and other issues that may not be visible during a regular exam.

Q8: How can I make my child feel comfortable at the dentist?
Pediatric dentists use child-friendly techniques and environments to help reduce anxiety and create a positive experience.

Q9: When should my child start flossing?
Children should start flossing as soon as they have two teeth that touch.

Q10: What is the best diet to prevent cavities in children?
A balanced diet low in sugary snacks and high in fruits, vegetables, and dairy helps prevent cavities.

The Importance of Bone Grafting in Dental Implants

Dental implants have become a revolutionary solution for replacing missing teeth. Unlike dentures or bridges, implants offer a more permanent and natural-looking alternative. However, one essential aspect of successful dental implants is ensuring that the jawbone has enough density and volume to support them. This is where bone grafting plays a crucial role. Without sufficient bone structure, implants may fail, leading to complications in both function and appearance. This article will explore the significance of bone grafting in dental implants, its methods, benefits, and frequently asked questions about the procedure.

What is Bone Grafting?

Bone grafting is a surgical procedure that helps regenerate and rebuild bone in the jaw where it may have deteriorated or been lost due to tooth extraction, trauma, or gum disease. In the context of dental implants, bone grafting ensures that the jawbone is strong enough to support the implant and provide a stable foundation for the artificial tooth.

Why Bone Grafting is Necessary for Dental Implants?

When teeth are missing, the jawbone begins to resorb, or shrink, over time. This process, known as bone resorption, occurs because the bone no longer receives stimulation from the tooth root. Over time, this leads to a decrease in bone density and volume, making it difficult to place an implant. Bone grafting compensates for this loss by restoring the necessary bone structure, allowing the implant to be securely anchored.

Types of Bone Grafting Procedures

There are several types of bone grafting techniques that dental professionals may use, depending on the individual needs of the patient:

Autografts

Autografts involve using the patient’s own bone, typically harvested from the jaw, hip, or tibia. This method is highly effective as the body is more likely to accept its own bone without risk of rejection. However, it requires additional surgery to harvest the bone, increasing recovery time.

Allografts

Allografts use bone from a human donor, which has been thoroughly screened and processed to ensure safety. This method eliminates the need for a secondary surgery but still provides a reliable foundation for implants.

Xenografts

Xenografts involve using bone from an animal, usually a cow, that has been treated to make it safe for human use. This option is popular due to its availability and effectiveness, though it may take longer for the body to integrate the foreign bone.

Synthetic Grafts

Synthetic grafts are made from biocompatible materials that mimic the structure of natural bone. They are an excellent option for patients who prefer not to use animal or human donor bone. These grafts eventually dissolve, leaving behind healthy, regenerated bone.

Dental Implants and Bone Grafting: A Comprehensive Approach

Dental implants require more than just a strong tooth root substitute; they also rely on a healthy, dense jawbone to anchor the implant securely. Bone grafting ensures that patients who may have experienced bone loss due to missing teeth, gum disease, or trauma can still receive implants. For individuals seeking long-lasting, functional, and aesthetic tooth replacements, bone grafting becomes an essential preparatory step.

Visit Website: https://paramusparkoralsurgery.com/all-on-4-dental-implants-nj/ for All-on-4 Dental Implants and more information about dental implant solutions and options that best suit your needs.

The Process of Bone Grafting for Implants

Bone grafting for dental implants is a straightforward procedure, though it varies in complexity depending on the extent of the bone loss. First, the surgeon will make a small incision in the gum to expose the jawbone. Then, the grafting material (whether from the patient, a donor, or synthetic) is placed at the site. The gum is stitched back together, and over the course of a few months, the graft will integrate with the existing bone, forming a solid base for the implant.

How Long Does Bone Grafting Take?

The healing process for bone grafting typically takes anywhere from three to nine months, depending on the size of the graft and the patient’s health. During this time, the graft will bond with the natural bone, ensuring a strong foundation for the dental implant. It’s crucial to follow the dentist’s care instructions closely to ensure proper healing.

Benefits of Bone Grafting in Dental Implants

Improved Implant Success

One of the primary benefits of bone grafting is the increased likelihood of implant success. By providing a strong and stable base, the implant can better withstand the forces of chewing and function like a natural tooth.

Enhanced Aesthetic Outcomes

In addition to improving the functionality of dental implants, bone grafting also enhances the aesthetic results. Rebuilding the bone in the jaw helps maintain facial structure and prevents the sunken appearance that can occur when teeth and bone are lost.

Prevention of Further Bone Loss

By grafting bone at the implant site, patients can prevent further deterioration of the jawbone. This is particularly important for long-term oral health, as continued bone loss can lead to additional complications.

Risks and Complications of Bone Grafting

While bone grafting is generally safe, there are potential risks and complications, as with any surgical procedure. These may include infection, nerve damage, or graft rejection. However, the risk of complications is low, and with proper care, most patients recover without issue.

Preparing for Your Bone Grafting Procedure

Before undergoing a bone graft, it’s essential to discuss your medical history with your dental professional. They will evaluate whether you are a good candidate for the procedure, considering factors such as your overall health, the condition of your jawbone, and any pre-existing conditions that may affect healing.

Post-Operative Care for Bone Grafting

Proper post-operative care is critical for successful bone grafting. After the procedure, you may experience some swelling, bruising, or discomfort, which can be managed with prescribed pain medications. It’s important to avoid smoking, excessive physical activity, and chewing hard foods during the healing process to ensure the graft integrates successfully with the natural bone.

Bone Grafting Alternatives

In some cases, alternative methods may be used instead of bone grafting. These may include:

Sinus Lifts

A sinus lift is a procedure performed when there is insufficient bone in the upper jaw to support an implant. By lifting the sinus membrane and placing a bone graft underneath, it creates enough space for a dental implant to be securely placed.

Ridge Expansion

In cases of severe bone loss, a ridge expansion may be necessary. This technique widens the jawbone by splitting it and adding bone graft material in between, creating the necessary space for the implant.

Is Bone Grafting Painful?

Bone grafting itself is not typically painful, as it is performed under local anesthesia or sedation. However, some discomfort may occur during the healing process. Most patients report mild soreness that can be managed with over-the-counter pain relief.

FAQs on Bone Grafting for Dental Implants

Q1: What is bone grafting in dental implants?

Bone grafting is a procedure that rebuilds bone in the jaw to support dental implants.

Q2: Why is bone grafting necessary for dental implants?

Bone grafting ensures the jaw has enough strength and volume to anchor an implant securely.

Q3: How long does the bone grafting procedure take to heal?

Healing typically takes between three to nine months, depending on the size of the graft and patient health.

Q4: What types of bone grafting materials are used?

Bone grafts can be autografts (from the patient), allografts (from a donor), xenografts (from animals), or synthetic.

Q5: Are there risks involved with bone grafting?

While generally safe, potential risks include infection, nerve damage, and graft rejection.

Q6: How do I prepare for a bone grafting procedure?

Discuss your medical history with your dentist, and follow pre-surgery instructions closely.

Q7: Can I avoid bone grafting for dental implants?

In some cases, alternative procedures like sinus lifts or ridge expansion may be considered.

Q8: Is bone grafting painful?

The procedure is performed under anesthesia, but mild discomfort may be experienced during recovery.

Q9: What are the benefits of bone grafting for implants?

Bone grafting improves implant success, enhances facial aesthetics, and prevents further bone loss.

Q10: What happens if I don’t get a bone graft before a dental implant?

Without a graft, the implant may not be secure, leading to failure or complications.

Why Tooth Resorption Occurs: Understanding the Root Causes

Tooth resorption is a complex dental condition that can perplex many patients and even some professionals due to its subtle onset and varying causes. Essentially, it refers to the breakdown and loss of the tooth’s structure, including its outer enamel, inner dentin, and sometimes even the root itself. Understanding why tooth resorption occurs is key to early detection and prevention of irreversible damage. Let’s dive deep into the root causes and explore how this condition develops.

What Is Tooth Resorption?

Tooth resorption is the process by which the body begins to break down and absorb the tooth structure, either from the inside (internal resorption) or the outside (external resorption). This can happen to both the crown and the root of a tooth. While it’s a natural part of losing baby teeth, in adults, it’s a pathological process that leads to tooth damage and potential tooth loss if left untreated.

Prevention of Tooth Resorption

While some causes of tooth resorption, such as genetics, cannot be prevented, maintaining good oral hygiene and attending regular dental check-ups can help reduce the risk. Avoiding excessive stress on the teeth, such as bruxism, and managing conditions like gum disease are also important steps in prevention.

For a more in-depth exploration of tooth resorption, including expert advice and treatment options, you can visit here. This resource provides comprehensive insights into the causes, diagnosis, and treatments of tooth resorption, helping patients understand their condition and seek timely dental care. Whether you’re dealing with symptoms or just want to learn more, visiting this link will guide you through everything you need to know about tooth resorption.

Types of Tooth Resorption

There are two main types of tooth resorption:

Internal Resorption

Internal resorption occurs when the dentin (inner part of the tooth) begins to be absorbed from the inside out. This often leads to a hollow appearance within the tooth, and the patient may notice a pinkish hue due to the enlarged pulp chamber. It is a rare occurrence but requires immediate attention once identified.

External Resorption

External resorption, on the other hand, starts from the outside and progresses inward. This type is more common and can affect the roots, causing them to shorten. If not detected early, external resorption can lead to severe damage and even tooth loss.

The Underlying Causes of Tooth Resorption

Understanding the causes of tooth resorption is crucial for both prevention and treatment. Several factors contribute to this condition, and each plays a different role depending on whether the resorption is internal or external.

Trauma and Injuries

One of the primary causes of tooth resorption is trauma or injury to the tooth. Physical trauma can trigger the body to start reabsorbing the tooth tissue, mistaking it as something foreign or damaged. This could be due to a direct blow, such as a sports injury or accident, or even due to chronic grinding or clenching of the teeth (bruxism).

Orthodontic Treatments

While braces and other orthodontic appliances are essential for correcting misalignments, they can also exert pressure on the teeth and roots, leading to resorption in some cases. The constant pressure applied to move teeth can occasionally cause the body to resorb the root structure, particularly if the force is excessive.

Chronic Inflammation and Infection

Inflammation, especially if it becomes chronic, is a significant factor in tooth resorption. When gums and surrounding tissues become infected, the body’s immune response can inadvertently target the tooth structure, leading to resorption. This is often seen in cases of untreated periodontal disease or pulp infections.

Genetics and Family History

Genetics can also play a role in the development of tooth resorption. Individuals with a family history of resorption are more likely to experience it themselves. While this factor is not within one’s control, awareness of genetic predispositions can help patients and dentists stay vigilant.

Teeth Grinding (Bruxism)

Bruxism, or the grinding and clenching of teeth, can put excessive stress on the roots and lead to resorption over time. The constant pressure wears down the protective layers of the tooth and can lead to both internal and external resorption if the habit persists.

Hormonal Changes

Hormonal imbalances, particularly those that occur during pregnancy, menopause, or due to conditions like hyperthyroidism, can influence the occurrence of tooth resorption. The fluctuation in hormones can weaken the tooth’s structure and make it more susceptible to resorption.

Resorption Due to Cysts or Tumors

In some cases, resorption occurs as a result of cysts or tumors developing near the tooth. These growths put pressure on the surrounding teeth, causing the roots or the crown to resorb over time. This is an uncommon cause but should be considered when evaluating the root causes of tooth resorption.

Symptoms of Tooth Resorption

Tooth resorption can be asymptomatic in its early stages, making it difficult to diagnose without a dental examination. However, as the condition progresses, patients may experience:

  • Pain or discomfort
  • A change in the color of the tooth (often pinkish or darkening)
  • Loose teeth
  • Swelling or sensitivity around the affected area
  • Visible damage to the tooth structure

Diagnosis and Detection of Tooth Resorption

Early detection of tooth resorption is critical to preventing permanent damage. Dentists typically use X-rays and other imaging techniques to identify the extent of the resorption. Regular dental check-ups are essential for catching resorption early, as it often develops without noticeable symptoms.

Treatment Options for Tooth Resorption

The treatment for tooth resorption depends on the severity and type of the condition. If detected early, it may be possible to halt the resorption process and save the tooth. Options include:

  • Endodontic therapy (root canal): Particularly for internal resorption, root canal treatment may be necessary to remove the inflamed pulp and protect the tooth from further damage.
  • Surgical intervention: In cases of external resorption, surgery may be required to remove the damaged parts and restore tooth function.
  • Tooth extraction: If the damage is too severe, tooth extraction may be the only option.

When to See a Dentist

It’s essential to see a dentist as soon as you suspect any abnormal changes in your teeth. Early diagnosis and intervention can prevent tooth resorption from causing irreversible damage, saving you from tooth loss and other complications. If you experience any signs of resorption or have concerns about your dental health, don’t hesitate to seek professional help.

FAQs

Q1: What is tooth resorption?
Tooth resorption is a dental condition where the body breaks down and absorbs the tooth’s structure, including the enamel, dentin, and roots.

Q2: What are the main types of tooth resorption?
There are two types of tooth resorption: internal resorption (from the inside out) and external resorption (from the outside in).

Q3: Can tooth resorption be reversed?
Once tooth resorption begins, it cannot be reversed, but early detection can help manage the condition and prevent further damage.

Q4: How is tooth resorption diagnosed?
Tooth resorption is typically diagnosed through dental imaging, such as X-rays, during a routine dental check-up.

Q5: What causes external tooth resorption?
External tooth resorption can be caused by trauma, orthodontic treatments, infections, or pressure from cysts or tumors.

Q6: Is tooth resorption painful?
Tooth resorption can be painless in its early stages but may cause pain or discomfort as the condition progresses.

Q7: How common is internal tooth resorption?
Internal tooth resorption is rare compared to external resorption but requires prompt treatment once identified.

Q8: Can genetics cause tooth resorption?
Yes, genetics can play a role in predisposing individuals to tooth resorption.

Q9: How can tooth resorption be prevented?
Preventing tooth resorption involves maintaining good oral hygiene, attending regular dental check-ups, and avoiding excessive tooth stress, like grinding.

Q10: What are the treatment options for tooth resorption?
Treatment options include root canal therapy, surgical intervention, or, in severe cases, tooth extraction.

Design a site like this with WordPress.com
Get started